Thursday, October 16, 2014

Nutty Chocolate Oat Cookies

 Filled with nuts and chocolate, this oat cookie is a healthier snack to satisfy your cravings. Keep a jar of these for those times when only a cookie will do.


Tomorrow I'm going to see my grandparents. I'm excited because I haven't seen them for quite a while. The only bad part about visiting my grandparents is the travelling. It is made worse by the occassional  frequent pangs of hunger my sisters and I have.

Stuffing your face with snacks, although delightful, is not exactly the best thing for your health. But having something to eat with you when travelling is absolutely essential.
While I was pondering over this, I wondered into the kitchen and my eyes fell on a huge box of porridge oats. So I thought "Why not make some oat cookies? They should be healthier than any other cookie"
And that's exactly what I did.


Nutty Chocolate Oat Cookies (Makes 18)

4 oz/110g butter or margarine
2 oz/55g light brown sugar and extra for sprinkling
2 tablespoons golden syrup
4 oz/110g plain flour
4 oz/110g porridge oats
1 1/2 oz / 40g almonds, chopped
3 oz/75g dark chocolate, chopped
3/4 teaspoon baking powder
1/4 teaspoon baking soda
A pinch of salt

Into a large bowl, sift in the flour, salt and raising agents. Add the chopped nuts and chocolate and mix with a wooden spoon to combine.
In a saucepan, over low heat, melt the butter or margarine, brown sugar and golden syrup until the sugar has sort of dissolved into the butter.While the butter is still hot, pour it into the dry ingredients and mix together.When you do this the chocolate will start to melt.You may have to use your hands to bring everything together.
Divide the mixture into 18 balls.On a wooden board or a clean work surface, flatten each ball of dough with your fingers and using, a palette knife, transfer them to a baking sheet.
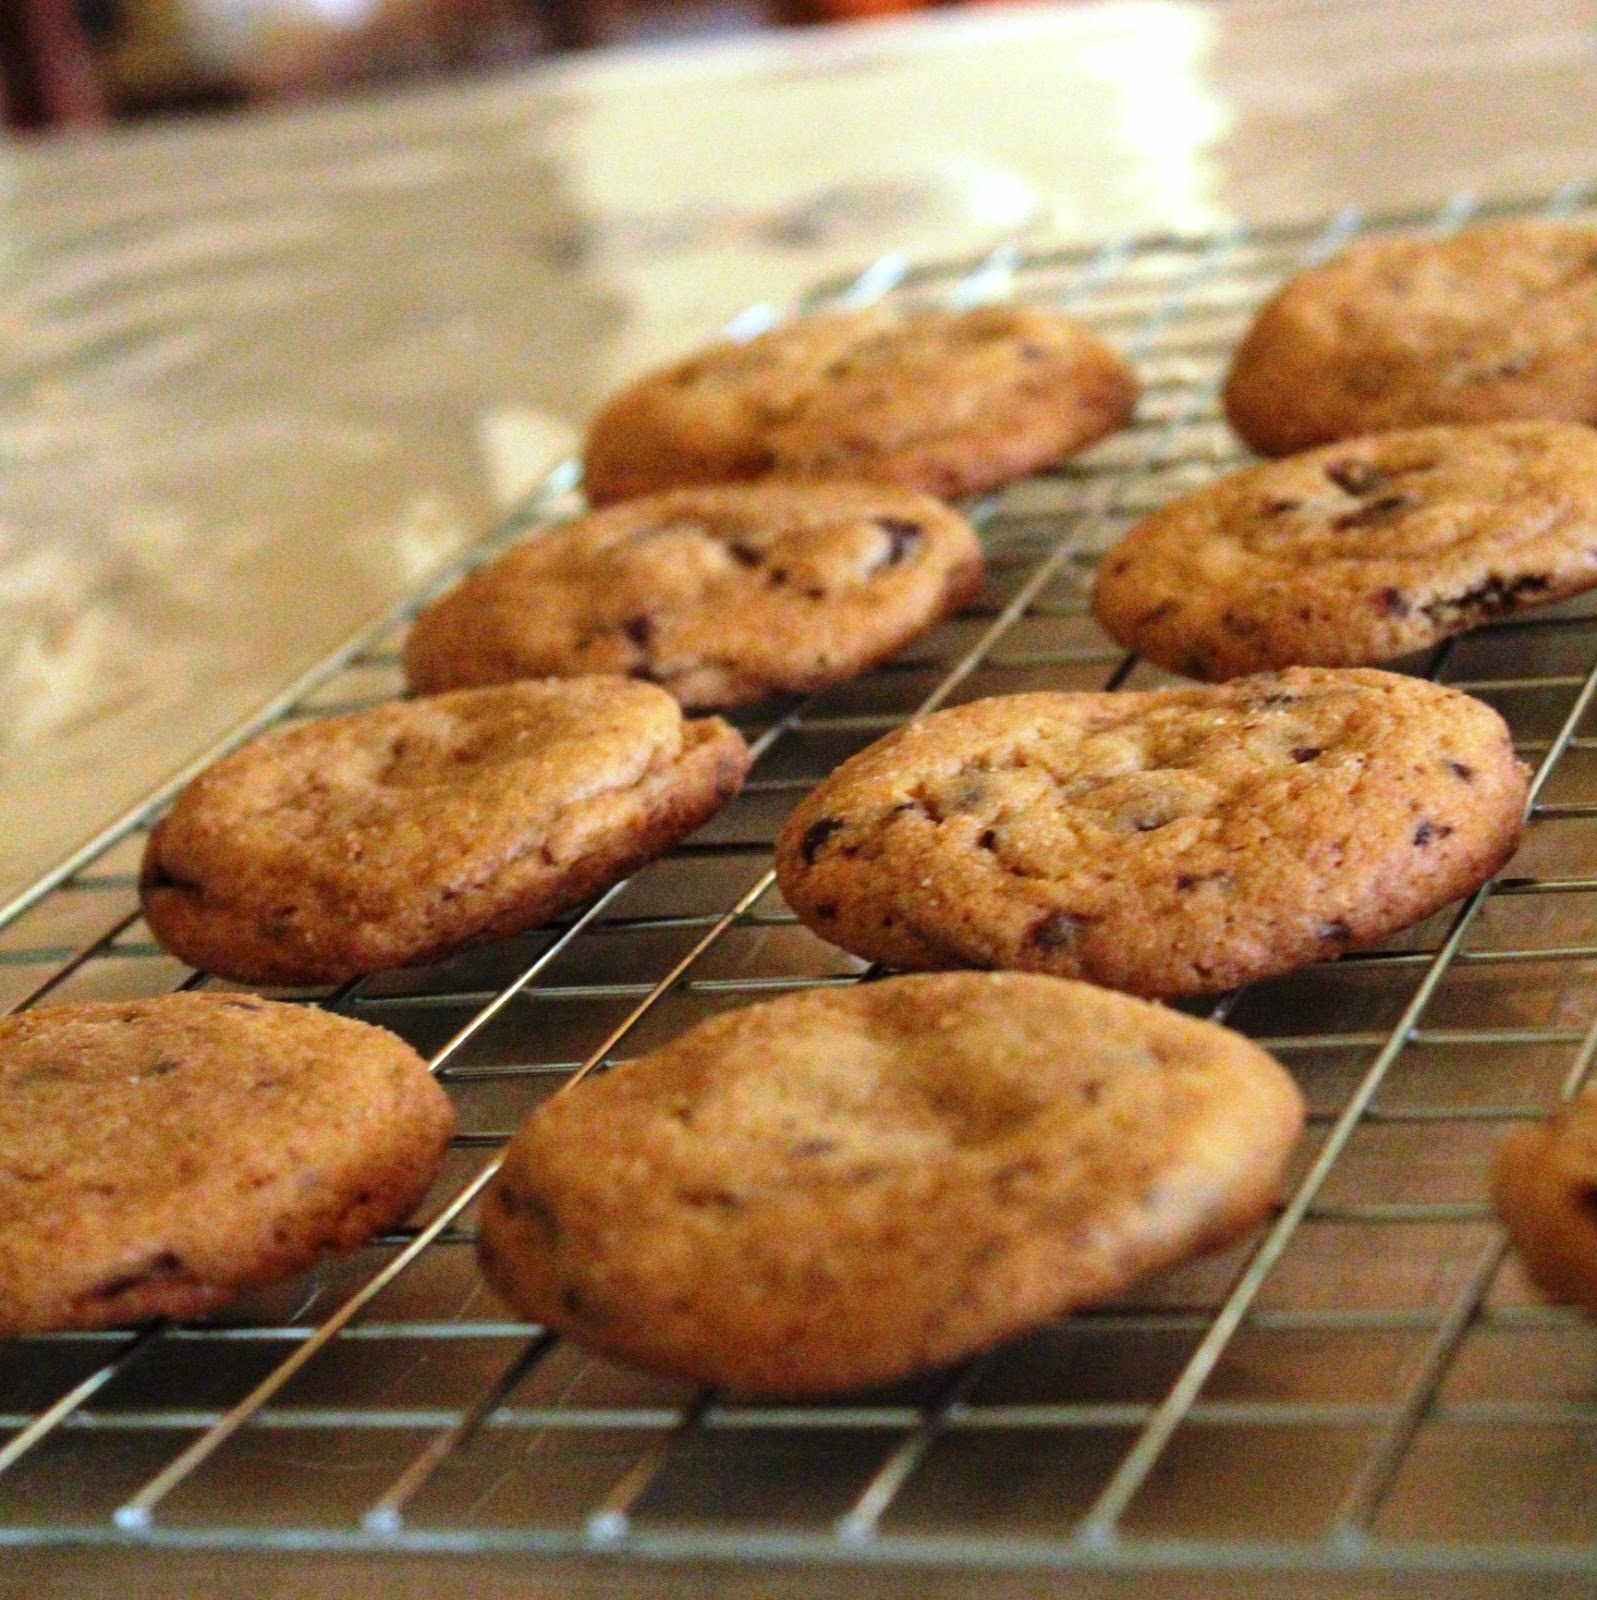
Bake for 12 to 15 minutes until the cookies are firm and just starting to brown. Transfer them to wire rack to cool. While they cool, the cookies will continue to cook further and harden a little more.

Notes on the recipe
  1. I didn't use blanched almonds in this recipe. This is because leaving the skins on gives the cookie a much better flavour. You could use pretty much any kind of nuts you wanted or even a mixture of them. (I'm going to try them with peanuts next time)
  2. Butter or Margarine would both work fine here. I used margarine because it's the "healthier" choice.
  3. You can use chocolate chips instead of chopping up dark chocolate (to make life easier)

Once all the ingredients are mixed, the mixture should look something like this.


Divide the mixture into 18 balls flatten them out and bake!


Monday, October 13, 2014

Chocolate Molten Lava Cake

Intensely chocolate-y with a gorgeous, gooey molten centre. Absolutely foolproof!
(Just follow this step-by-step recipe)


There's nothing like chocolate to help you take a break! This is the story of how a five minute break from studying turned into three gorgeous chocolate lava cakes.

Normally when I take a break, I read through my steadily growing collection of recipe books or as I've mentioned before, take a look at food related posts on Google+. If I need a longer break I watch an episode of Grey's Anatomy(with which I am obsessed). These days I've been watching past and present episodes of The Great British Bake-Off (this year's series was epic!). But today found myself wandering into the kitchen......
(My head is always in the kitchen but these days I haven't been baking much because I need to study. So I've stuck to baking stuff in my head) 


I spent a lot of time last year trying to perfect this recipe. I eventually did it but this was before I got my camera, so I don't have any photos of my failed attempts to share with you.
This recipe is combination of several, from my recipe books and the internet. I was extra good today and took photos of all the steps. Don't worry about making this cake. It will turn out just fine if you follow the recipe exactly right.

Chocolate Molten Lava Cake
(makes 3)

100 g (4 oz) Dark Chocolate
85 g ( 3 oz/ 1 1/2 sticks) unsalted butter
2 eggs
2 egg yolks
50 g (1/4 cup) sugar
30g (1/4 cups) plain flour
1/2 teaspoon vanilla extract
A pinch of salt
3/4 teaspoon instant coffee granules (completely optional)

Grease 4 ramekins with butter and preheat the oven to 200C/ 400F.
Melt the chocolate in a bain-marie or in the microwave. The chocolate should be chopped up roughly or you could use dark chocolate chips to make life a lot easier.


If you're melting in the microwave, do it in 30 second increments, stirring in between. This is to make sure the chocolate does not get too hot and start to seize (this has happened to me a few times before). If the chocolate seizes, it will become grainy and you won't end up with a smooth and glossy chocolate and butter mixture, like this.


Stir in the coffee granules and salt into the chocolate while it's still hot. This will make sure the coffee dissolves properly.
Let the chocolate cool. Meanwhile, beat the sugar and eggs on high, in a stand mixer or with a handheld electric whisk, until they are thick and mousse-like. They should be fluffy and really pale and will have almost tripled in volume. This will take around 4 minutes ( I haven't really timed it).
Beating the eggs like this makes the cake really soft and also helps it rise a little.


Slowly pour the melted chocolate into the eggs and sugar mixture, with the mixer on a low speed.(The chocolate and butter should be completely cooled when you do this. DO NOT do it when the chocolate is still too warm), You can put it into the fridge to speed things up.Add in the vanilla extract.

Sift the flour over the mixture and gently fold in until just incorporated. Take care not to over-mix.
By this time the volume of the batter will have reduced a little and that's okay, but you should be careful so that it doesn't reduce too much.
The mixture will be slightly thick and glossy.


Spoon the batter into the prepared ramekins. Each will get about one cup of batter.
Bake the cakes for 12 to 15 minutes. Keep a close eye on them.They should still be a little soft in the middle ( this means they are molten inside ) and a little firm around the edges.
Check them in 12 minutes. If they're not done, keep checking every 30 seconds. It's very easy to overcook them.

The longer the cake sits, it cooks more inside, so it's better to eat them while they are still a bit warm ( Not piping hot, obviously!). When the cakes have cooled slightly, run a knife around the edges. Then gently push the cake towards the middle.This is to release it from the bottom of the ramekin. Turn the ramekin over onto your serving plate and gently tap the bottom of the ramekin. The cake should fall out.

Give the cake a dusting of icing sugar. Eat with a scoop of vanilla ice cream or just on its own!


Notes on the recipe
  1. The instant coffee granules are for an added boost of flavour. You can leave them out, if you prefer.Make sure to add the vanilla and salt though, because they really enhance the flavour of the chocolate.
  2. A common problem with lava cakes is that they are difficult to turn out. I fact, I hardly ever do this. I eat them straight from the ramekin or I bake them in teacups which look very pretty.


These lava cakes are proof that a little extra effort goes a long way. Tell me what you think about this recipe. Is it worth a try?

Sunday, September 7, 2014

Funfetti Mug Cake

A soft, light and fluffy cake loaded with sprinkles and topped with vanilla frosting, that takes only seconds to bake! The sprinkles give you an explosion of colour as you dig into it.


I found this recipe by accident. An extremely lucky accident, I should say.

This morning I was having trouble keeping awake. Studying chemistry naturally puts me to sleep so I had to find a way to wake myself up. So I turned to my treasure trove of food-related posts on Google+. I was instantly awake and alert and also filled with a craving for something baked. A cake perhaps.....Then the words 'mug cake' caught my eye.

I watched the video where Gemma Stafford makes 5 different kinds of mug cakes (you can find it here). It looked so quick and easy, I knew I had to make one right away!

I used a Vanilla Frosting but you could use pretty much any kind of frosting with this cake. It's up to you =)
Gemma uses a Bubblegum frosting with this cake that looks pretty good too! You can find the recipe in the link above.


Funfetti Mug Cake (Makes 2)

2 tbsp (2 oz/60g) unsalted butter
1 large egg
2 tbsp milk
4 tbsp (50g) granulated sugar
1 tsp vanilla extract
6 tbsp plain flour
3/4 tsp baking powder
a pinch of salt
sprinkles

In a heat-proof bowl, melt the butter in the microwave. Let it cool.
Whisk in the egg, then the sugar, milk and vanilla.
Sift in the flour, baking powder and salt and mix well. Add the sprinkles.
Divide the batter between two mugs and microwave for 50 seconds. Be careful not to overcook them as they can go dry (One of mine did because I left it in for a minute)
Let the cakes completely cool before you frost them.

Enjoy!


Tuesday, September 2, 2014

The Best Chocolate Chip Cookies. Ever.


I've found it. The perfect choc chip cookie. I have to thank Sally who is the creator of the most awesome blog, Sally's Baking Addiction. Her recipes are so innovative and her photos make them so much better.


These cookies really are soft and chewy and thick as she describes.She explains the whole process of making this cookie here, with the science behind each step which I found extremely helpful and I learnt a whole lot about my friend the Chocolate Chip Cookie and the love that goes into it. You don't need to use a mixer but that doesn't make them tiring to make. These cookies are way too easy to make and what's more, you really enjoy it.

Lately I've been making Nigella's Choc chip cookie recipe because it used melted butter which was much easier for me. I found that it made the cookies just a bit more chewy but they never came out soft, the way I like it. Sally's recipe uses cornstarch, it gives the cookies a very soft consistency. You also have to chill the dough for a good 2-3 hours if you want the perfect cookie. I got very impatient and almost put the dough into the freezer so it would chill faster. But I was afraid it would affect the texture of the cookie so I left it alone. Later I left a comment on Sally's blog asking her if it's okay to chill the dough in the freezer and she said this would create some frozen spots of dough with some chilled. So no, I am never going to chill any kind of cookie dough in the freezer. Sometimes being patient gives you the best results =)


Get the recipe for this awesome cookie HERE.


<a href="http://www.bloglovin.com/blog/12822623/?claim=ds2z45bzapw">Follow my blog with Bloglovin</a>

Sunday, August 24, 2014

Malaysia!!!

I spent a week in Malaysia a few weeks ago. I had the most amazing time with my friends. This post is long overdue. I've taken so many photos so it was really difficult deciding which ones to post.

The highlight of the week, for me was the revolving restaurant at the top of the Kuala Lumpur tower. The view was stunning and the desserts were scrumptious!


Friday, July 11, 2014

Banana cake with Passion fruit glaze

Two weeks ago, there was a passion fruit sitting by itself in the fruit-basket. It was nearing old age, by which I mean it was starting to get all wrinkled and would soon be too ripe to use. I knew I had to save it but what can you do with just one passion fruit? My mind was instantly drawn to a picture of a cake covered with a yellow icing, dripping over its sides and studded with the black of those crunchy passion fruit seeds. It was perfect. I had to make it!
Having duly hunted out the recipe book I read through the ingredients for the banana cake and the icing, I realized I wouldn't have enough passion fruit pulp for the icing. I would have to make a smaller cake. Then I realized this would be the perfect occasion to try the banana cake from my Little Cakes recipe book. So I went for it and here is the result.

Let me ask you, does this look like Passion fruit Icing to you? No. That's because it isn't my predicted icing. It's a passion fruit glaze. And how did the icing turn into a glaze? I'll tell you. Having made the icing I thought it was a little too thick to cover the cake so I impulsively added a bit of warm water. The icing became instantly too runny and I was out of icing sugar to make it thick again. I was extremely disappointed because I was hoping to create a cake that looked as good as the one in my recipe book. It was one of those you feel like a complete failure. But then I remembered this particular quote of Julia Child's.
"The only real stumbling block is the fear of failure.In cooking you've got to have a what-the-hell attitude."
So I figured, what-the-hell! I'm glad I didn't throw away the failure of a passion fruit icing, which I will now refer to as a passion fruit glaze (even though it doesn't involve any cooking), because it completely transformed the banana cake into an incredibly moist, sour yet sweet delight!
The banana cake is moist, dense and firm.It really is a small cake packed full of flavour as the book promises.

Recipe
Banana cake adapted from Little Cakes

156g (1 1/4 Cups) all-purpose flour
1 1/2 tsp baking powder
1/2 tsp baking soda
1/4 tsp salt
80g/3 oz soft,unsalted butter
50g (1/4 cup) sugar
50g (1/4 cup) brown sugar
2 eggs
1/2 tsp vanilla extract (or 1/2 tsp banana essence)
2 tbsp buttermilk (I substituted with 1 tbsp plain yogurt and 1 tbsp milk)
1/2 cup mashed, overripe banana

Prepare a 8 or 9 inch round cake pan. Preheat the oven to 180C/350F.
Sift the flour, baking powder, baking soda, salt into a large bowl and stir to combine.
Cream the butter with an electric mixer until light and fluffy. Add the sugar gradually, creaming continuously until fluffy.Add the eggs one at time, beating well between each addition. Mix in the flavouring.
Stir the buttermilk into the mashed banana.
With the mixer on medium, add in a third of the dry ingredients followed by a third of the banana mixture. Repeat this until all the ingredients are added (make sure you beat thoroughly after each addition.)
Pour into the prepared pan and bake for 25 to 30 minutes.

Note: Overripe bananas give the best flavour.

Passion fruit Glaze

100g icing sugar
1- 1 1/2 tbsp passion fruit pulp
1 tbsp warm water

Mix everything together, adding the water drop by drop until you get a slightly runny but still spreadable consistency.(you may need to add less or more water than stated in this recipe)


Saturday, July 5, 2014

A Beginning - (Chocolate Chip Cookies)

Here I am, two weeks into my last ever year of school. The last year I get to be a kid, fool around, hang out with my friends; basically continue with my irresponsible existence. After this year, who knows what life has in store for me? I sure don't.


It's also going to be the hardest and most demanding year of school I've had yet. In a few months I'm going to have to study like my life depends on it, and believe me, it will. But for now I'm happily enjoying my slowly yet surely diminishing free time and anticipating a certain opportunity to gain some exciting new experiences.


I made these chocolate chip cookies two weeks ago to take to school, but I was too busy and sometimes too lazy to post the recipe. This was the first time I had made choc chip cookie in a while, so I wanted to try something different. I chose Nigella lawson's recipe because it used melted butter, which is easier than creaming the butter and sugar so these cookies don't take a lot of time to make.


The resulting cookie was pretty good,,,,, fudgy,  yet with a crispy exterior. my friends loved them!
Get the recipe here.I'm not going to write it out because Nigella explains it pretty well.

I added a tablespoon of cocoa powder to make the cookies a little more chocolate-y but you don't have to. That is entirely up to you. I always tend to gravitate towards extra chocolate. The more there is, the better!
I don't like the chocolate chips we have in the supermarkets here in Sri Lanka. I never use them. For these cookies I used 300 grams of dark chocolate chopped up into little pieces.
Enjoy :)